Pages

Friday, January 29, 2010

Garlic Parmesan Roasted Potatoes


Print

Look at those potatoes! They're crunchy, crispy and tender. And really, really good! Just another simple and healthier alternative to the fried potato we Americans love to indulge in! What's not to love?!

My eating addictions come in the form of carbs, starch and cheese. If it's potatoes, pasta, rice or bread.....I'm there. And if it has cheese on it, I'm there even faster and longer! Ahhhh....if only my hips didn't love them so much...I could eat them forever in a day.

But back to reality. While those things are super delish to eat, they're not always the best for us, which is why I like to find alternative methods of making them so when I do indulge, I don't have to feel as bad! These potatoes are definitely a way for me to get my french fry fix. While I love the taste of fries, believe it or not, it's more of a "texture thing" for me when I do have them. I especially love McDonald's fries. They're my favorite...hands-down. My perfect fry is a little crispy on the outside, but super mushy on the inside; almost to a point where you know that they're cooked by the crispiness on the outside, but they're not cooked all the way because they kind of bend or give when you pick them up. And you can bet that I will pick through my entire box of fries to eat those first before finishing the rest. I've even been known to pick them off of others' plates (of people I know, of course)! Ahhh....perfection.

So, these potatoes go a long way in my book because they satisfy my every need of a McDonald's french fry. Amen.

Garlic Parmesan Roasted Potatoes

Ingredients
2 Lg. Idaho Potatoes, peeled and cut into 1" chunks
2 Tbsp. Olive Oil
1 1/2 Tsp. Garlic, minced
1/4 cup Parmesan Cheese, grated
Salt
Pepper

Directions
Preheat oven to 425 degrees.

In a med-large bowl, mix together the potatoes and olive oil to coat completely. Mix in garlic and Parmesan cheese and season with salt and pepper to taste.

Pour potatoes evenly onto a baking sheet lined with foil. Bake for 30 minutes and serve immediately.

Yield: 4 Servings
Source: With a Cherry on Top
Continue reading...

Creamy Cheesy Mashed Cauliflower


Print

Everyone knows that eating cauliflower is nothing but good for you. We eat cauliflower on a weekly basis; typically, it's by roasting it with a little olive oil, garlic, salt, pepper and Parmesan cheese. YUM. But there is only so much of roasted cauliflower that you can possibly eat before growing tiresome and bored with it.

What are our other options you ask?! Well, we could steam it; however I find it to be rather bland. My preferred method would be to drench them with melted cheese but that's just not good for us and we're really trying not to go there! Grilling is a good option for most vegetables, but I'm not sure how I feel about cauliflower on the grill. I don't know. I've never tried it. Maybe something to think about...who knows, it could be the best thing I ever ate!

What about mashing them?! That's right. No potatoes here, just straight up cauliflower! It's quite like mashed potatoes in the texture and I guess a little bit in the flavor, but you still definitely get that distinct cauliflower flavor when mashing them even with all of the "extras" you throw in! It's actually a really nice alternative to mashed potatoes (if you like the flavor of cauliflower) because it's better for you and you're kind of fooling your taste buds with the texture similarities between that and the potatoes. When I make my mashed cauliflower, I like to treat it the way I would with mashed potatoes, so I tend to doctor it up and make it extra creamy, extra cheesy and extra good!

Creamy Cheesy Mashed Cauliflower

Ingredients
1 Lg. Cauliflower Head
3 cloves Garlic
1/4 cup Heavy Cream
2 Tbsp. Cream Cheese
2 Tbsp. Parmesan Cheese
Salt
Pepper

Directions
Remove the stems from the cauliflower head and place into a large pot of water with just enough to cover the top of the cauliflower. Bring to a boil and let cook for 20 minutes over high heat. Drain and remove the cauliflower from the pan, letting it sit on a plate for approximately 5 minutes to drain any excess water left in it.

Place the cauliflower in a med-large bowl with the heavy cream. With a potato masher, begin mashing the cauliflower, mixing it in with the cream until it obtains a smooth consistency. Add in the cheese and mix well until combined. Season with salt and pepper to taste and serve immediately.

Note: Heavy Cream may be substituted with milk and depending on the size of the cauliflower, you may need to alter the amounts of ingredients you put in to get it to your desired consistency.

Yield: 4 Servings
Source: With a Cherry on Top
Continue reading...

Thursday, January 28, 2010

Honey Mustard Chops with Fresh Apple Slaw


Print

I don't know why, but I feel like I always have the darndest time coming up with creative ways to prepare pork, specifically, pork chops. Now there is always the traditional so-called "Betty Crocker" method of breading them and serving them with applesauce, because after all, who doesn't like pork chops and applesauce?! But breading them is just messy and fattening and it doesn't really appeal to me anymore.

One thing I love with pork is mustard - not the yellow kind you'd put on your hot dog but a Dijon mustard or spicy mustard or even a grainy mustard of some sort. And what doesn't pair well with mustard other than honey?! You're probably thinking by now, then why don't you use honey mustard?! I'll tell you why. It's not the same. Pure and simple - it's definitely not the same. I like honey mustard, but I like making my own version, again, because I can control the ingredients and alter the flavors to my liking. It's really a brilliant idea to take advantage of when you're cooking! You should try it!

Recently, a fellow foodie/blogger, things alauna makes, came up with a dish that grabbed my attention - so much that I put it on the menu for this week! It was a pork chop dish utilizing my favorite pork ingredients: mustard, honey and apples. I tweaked it a little bit to my liking, but I've gotta tell you that this adaptation has got to be the best version of pork chops I have ever had! The flavors were perfect and for the first time in my life, I can honestly say that I cooked a pork chop to perfection! I'm not trying to brag or anything, but pork is hard for me to cook. It always makes me nervous that it's not done and then I end up over-cooking it, making it tough and chewy. Not this time. This time, it was juicy and tender and it wore the flavors of honey and mustard so well. Sitting on top of a bed of apple slaw, each bite was perfection! You got the juiciness of the steak with the flavors of the honey mustard sauce, the crunch of the slaw and the tanginess of the dressing all rolled into one. Every bite left my mouth yearning for the next...it was unbelievable! Thanks Alauna for this wonderful version of pork!

Honey Mustard Chops with Fresh Apple Slaw

Ingredients
1 Lg. Granny Smith Apple, sliced into matchstick size
1 Sm. Red Cabbage head, shredded
7 Scallions, cut into 1" pieces
2 Tbsp. Lemon Juice
4 Tbsp. Olive Oil
2 Tbsp. Cider Vinegar
4 Boneless Pork Loin Chops
Salt
Pepper
1 cup Chicken Stock
1 1/2 Tbsp. Dijon Mustard
2 Tbsp. Honey

Directions
In a medium bowl, add the cabbage, apple and scallions. Mix in lemon juice and toss to coat. Add in 2 Tbsp. olive oil and vinegar; toss to combine. Refrigerate until ready to serve.

In a large non-stick skillet, heat remaining olive oil over med-high heat. Season both sides of the pork chops with salt and pepper to taste; carefully add to skillet. Cook for approximately 8 minutes on each side and remove pork chops from pan, allowing to rest.

Pour chicken stock into the pan and using a whisk, begin to scrape bits of pork left on the pan, mixing into the stock until well combined. Bring to a boil and then reduce heat to low. Add in mustard and honey; stir to combine. Cook on low until heated through (about 3-5 minutes). Add pork back into the pan and let re-heat in the sauce (about 3 minutes).

Serve immediately over apple slaw.

Yield: 4 Servings
Source: Adapted from things alauna makes
Continue reading...

Wednesday, January 27, 2010

Asiago Garlic Bread


Print


In every meal, I try to incorporate a vegetable and carbohydrate to go with the protein or main portion of the dish. Typically, carbs for us, tend to be various forms of potatoes, pasta, rice and bread. Although, I do try to shy away from eating bread for dinner often (as we normally have it quite a bit throughout the day in other meals). And usually the type of carbs I choose will reflect the meal, itself, and complement it.

That goes without saying that garlic bread is one of those carbs that goes with nearly everything! When most people think of garlic bread, their mind immediately is drawn towards Italian foods, primarily pasta. But, it's great with steaks, seafood, soups and even the lightest version of a salad! It can also be prepared in a variety of ways; aside from the basic method of baking, you can grill it or broil it. And while it's garlic-y goodness is wonderful on it's own, it's substantially tasty substituted as a hamburger bun, making croutons out of it or even just "sopping" up the juices from a wonderfully prepared seafood dish with it.

I love garlic bread and I went all out with every form of traditionalism in making this recipe. I baked it and I served it with pasta. You don't get much more traditional than that folks! But sometimes tradition is good and I am a bit of a traditional gal! Making homemade garlic bread is so easy and it tastes so much better than the frozen version and it's much better for you without all of those nasty preservatives. I can't truly call it homemade-homemade because I didn't make the bread - I cheated there - but it's close to being homemade and it was GOOD.

Asiago Garlic Bread

Ingredients
2 Asiago Cheese Rolls (from bakery)
4 Tbsp. Butter
1/2 Tbsp. Fresh Basil, minced
3 Tbsp. Garlic, minced
1 Tsp. Fresh Parsley, minced
1/2 Tsp. Oregano
2 Tbsp. Parmesan Cheese, grated

Directions
Preheat oven to 500 degrees. Slice each roll in half and place on a baking sheet lined with aluminum foil, sliced side up.

In a small sauce pan, melt the butter over med-high heat. Add in the remaining ingredients and stir until combined. Brush the butter sauce on each piece of bread.

Bake for 7-8 minutes or until browned.

Yield: 4 Servings
Source: With a Cherry on Top
Continue reading...

Chicken Ravioli with Peas, Shallots & Warm Butter Sauce


Print

Who doesn't love pasta?! I honestly cannot think of one single person I know that doesn't enjoy a good, hearty pasta dish. Can you? I mean, really, I can't. I can tell you people who don't like all sorts of things that are loved by many (and I think they're crazy) but I don't know of anyone who will turn down pasta every now and then!

There is something so warm, inviting and reminiscent about eating it. It's comfort food (especially mac 'n' cheese)! But most pasta is certainly not inviting to our bellies (the shape of it, that is) and in my case, the hips. But I will be the first to tell you that I will never officially "diet" because that would mean cutting out pasta and that just aint gonna happen. Period.

So when I came across a "lighter" version of a pasta dish on Noble Pig's blog, I was immediately drawn to it and knew I needed to make something similar. She made a ravioli dish with peas and shallots in a warm buttery sauce. It sounded good, it looked good and I was 99% sure it would be good. I was right. It was amazingly good. Even though it sat in a butter sauce on my plate, it wasn't drenched and there wasn't a ton of it, so it really was a rather lighter dish (unlike the heavier cream and marinara sauces you normally get).

The flavors exploded with my first bite and the warm butter with the sweetness of peas and shallots married with hints of lemon was like sunshine in my mouth! The only modification I made to this dish was making homemade ravioli using up leftover chicken from this meal. In my opinion, there is nothing better than homemade pasta (especially in chicken noodle soup) and the combination of the ricotta cheese, grilled chicken and basil paired so well with the sauce. It was a perfect ending to my day!

Ravioli with Peas, Shallots & Warm Butter Sauce

Ingredients - Ravioli
2 1/2 cups Flour
1 cup Hot Water
3/4 cup Ricotta Cheese
1 Egg
1/2 cup Chicken, chopped
1/4 cup Parmesan Cheese, grated
2 Tbsp. Fresh Basil, finely chopped
1/2 cup reserved Pasta Water
1/2 Tsp. Salt
1/4 Tsp. Pepper

Ingredients - Sauce
2 Tbsp. Butter
2 Shallots, sliced
1 - 10oz. bag Frozen Peas
1 Tsp. Lemon Zest
1/4 cup Parmesan Cheese, grated
Salt
Pepper

Directions - Ravioli
In a large bowl, combine the flour and water. Using a wooden spoon, stir to combine into a large ball. Cover the bowl with plastic wrap and let sit for 10 minutes.

In a medium bowl, combine the ricotta, egg, chicken, Parmesan, basil, salt and pepper. Mix together well.
- Rotisserie chicken or other forms of meat can be substituted as well as no meat at all.

To form the ravioli, cut the dough into 4 evenly sized pieces. Note: the dough should be slightly sticky. Add extra flour as necessary for rolling, but use only a little as necessary. Roll each piece into approximately a 4"x19" rectangle. Place 9 rounded teaspoons of filling about 1" apart down the center of the dough. Fold the dough over the filling, pressing down around the edges of each section of filling. Cut the ravioli into small squares and seal the edges by pressing around the filling with your fingertips. Place the finished ravioli on a baking sheet and continue forming ravioli with the remaining dough.

Bring a large pot of water to a boil over high heat. Add half of the ravioli and cook until they begin to float (approximately 4 minutes). Drain into a bowl and cook the remaining ravioli.

Directions - Sauce
In a large pan, melt the butter over med-high heat. Add shallots and cook until they become tender and slightly translucent (approximately 3 minutes). Stir in the peas, lemon zest, Parmesan, water, basil salt and pepper to taste. Cook until peas are heated through (approximately 2-3 minutes).

Serve immediately over ravioli. - Store bought ravioli may be substituted for homemade.

Yield: 4 Servings
Source: Recipe adapted from Giada at Home & Noble Pig
Continue reading...

Tuesday, January 26, 2010

Grilled Chicken Sandwich with Caramelized Onions & Gorgonzola Cream Sauce


Print

Sometimes the best dishes are the most simple.  This sandwich is simple.  I mean, really simple.  It doesn't get much easier than a grilled chicken breast seasoned with a little olive oil, salt and pepper on top of a grilled kaiser roll! 

No need for mustard, mayonnaise, hot sauce, additional cheese or any dressings of any sort for this sandwich!  So please do us all a favor and put away those condiments!  All you need is a little bit of caramelized onions drenched in a Gorgonzola cream sauce...mmmm.  Pure heaven.

Actually, there really is nothing fancy about this dish other than the name and really, that's not fancy!  The words "caramelized onions" and "Gorgonzola cream sauce" may initially scare you away, but don't run too far!  I'm serious when I say that it's simple.  What's more difficult than throwing some onions in a pan with butter and letting them go until they get soft and tender and sweet.  And the cream sauce?  Piece of cake!  Pour in a little heavy cream in the pan of onions, let it thicken and add in your cheese.  Didn't I say it was simple?!

But the flavor...ooh, now let me tell you about the flavor.  There is nothing simple about that!  In fact, the depth of flavor coming from this sandwich is unbelievable.  It is so tender and sweet and creamy and really, it just melts in your mouth.  All I needed was this sandwich and nothing else.  I was speechless and when you take your first bite, you'll be left speechless as well!


Grilled Chicken Sandwich with Caramelized Onions & Gorgonzola Cream Sauce

Ingredients
4 Lg. Chicken breasts
Olive Oil
Salt
Pepper
1 Lg. Yellow Onion, sliced
4 Tbsp. Butter
1 cup Heavy Cream
1/2 cup Gorgonzola Cheese
4 Kaiser Rolls

Directions
Preheat grill to med-high heat.  Season chicken with a little olive oil, salt and pepper to taste. Place on grill and cook for 7-8 minutes per side or until juices run clear.  Transfer to a plate and let rest.

In a large skillet, heat butter over medium heat.  Throw in onions and saute for about 8 minutes or until browned and tender.  Reduce heat to simmer and add in cream, stirring frequently.  Let reduce by half and thicken up, about 5 minutes.  Stir in cheese until well-combined and melted in.

Place chicken on a roll and top with onion cheese sauce.  Serve immediately.

Optional: Lightly butter the rolls and place on grill (buttered side down) for 1-2 minutes or until they become lightly crisped and warm.

Yield: 4 Servings
Source: With a Cherry on Top


Continue reading...

Thursday, January 21, 2010

Sweet Caramel Cake


Print


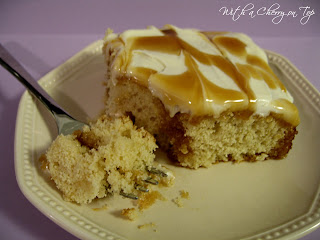
When it comes to dessert, cake is usually not my first preference. I don't know why, but I'm just not a big "cake" person. I like it and I'll eat it, but I'd rather have ice cream or cheesecake! But when I came across this recipe in one of my Taste of the South magazines, I knew that someday I would have a craving for cake, particularly this cake!

For someone who doesn't eat a lot of cake, this is definitely one of those recipes to help them fall in love! OH MY! This was one of the most luscious, sweet-tasting, creamy and moist cakes I have ever sunk my teeth into! Talk about mmm...mmmm....mmmm. It's just an ordinary cake with holes filled with creamy caramel-ly goodness! And on top: a vanilla-flavored cream cheese frosting with what else? Caramel drizzled all over. Need I say more?

Sweet Caramel Cake

Ingredients - Caramel Cake
2 cups Flour
2 Tsp. Baking Powder
1/2 Tsp. Salt
1/2 cup Unsalted Butter, softened
1/2 cup Sugar
1/2 cup Brown Sugar, packed
3 eggs
2 Tsp. Vanilla Extract
3/4 cup Half-and-Half
2- 12.5oz jars Caramel Topping

Ingredients - Cream Cheese Frosting
8oz. pkg. Cream Cheese, softened
1/2 Tsp. Vanilla Extract
1 1/2 cups Powdered Sugar

Directions - Caramel Cake
Preheat oven to 350 degrees. Lightly spray a 13x9" cake pan with baking spray and dust with flour; set aside.

In a medium bowl, whisk together the flour, baking powder and salt; set aside.

In a large bowl, beat together butter and sugar at a high speed until light and fluffy (approximately 5 minutes). Add in the eggs one at a time, beating well after each addition. Add in vanilla, stirring to combine.

With mixer set at low speed, add in flour mixture in 3 batches, alternating with half-and-half, beating until smooth. Spread batter in prepared pan and bake for 25-30 minutes (or until toothpick inserted in center comes out clean).

Remove from oven and with a wooden spoon handle, poke holes throughout the warm cake. Pour 1 jar of the prepared caramel topping over the cake, allowing it to "fall" into the holes. Let the cake sit at room temperature, uncovered, for approximately 2 hours or until cake is cool and caramel is absorbed.

Directions - Cream Cheese Frosting
In a large bowl, combine cream cheese and frosting. Beat at med-high speed until creamy (approximately 2 minutes). Add in powdered sugar, beating until smooth.

Spread over cooled cake and drizzle remaining jar of caramel on top. Drag a butter knife through caramel topping to create desired design. Store tightly covered in the refrigerator for up to 5 days.

Yields: 12 servings
Source: Adapted from Taste of the South
Continue reading...

Wednesday, January 20, 2010

Wild Bill Chewies


Print


This past weekend, we drove to Alabama to visit my future father-in-law (aka: Chris' Dad, Bill). I call him my future father-in-law because it's only a matter of time that he will be, so why not?!  Bill LOVES sweet treats (especially made by yours truly). He requested another Pumpkin Roll, which I brought in addition to a few other goodies like these delectable cookies!

I had in mind something I wanted to make, but when I went to make it, I realized it wasn't going to work with what I had on-hand. So, I had to resort to Plan B, which really didn't exist. I had no Plan B. Nadda. Nothing. Zilch. I panicked for a quick minute and then decided to just wing it. Some of my best failures have turned into my best successes by just winging it, so I figured I had nothing to lose. This was definitely one of those moments and it quickly rose to the top of my list of cooking successes.  I'm not trying to toot my own horn or anything...toot toot!

When they came out of the oven and I "tasted" a bite for the first time, I winced, hoping that they wouldn't be too terrible and I could just pass them off as a good cookie.  But they were SO much more. I made Chris try them and his eyes lit up the moment they hit his tongue. SUCCESS! I had no idea what I was doing, but these cookies are chewy and soft and packed with powerful bites of chocolate, oats, coconut, caramel and pecans.

My next challenge was coming up with a name for them as I really didn't know what to call them.  I thought Bill may be able to assist with that, so I waited to see what his verdict would be.  He immediately grabbed one from the bag....and another.....and another. That man ate 4 cookies that night! Insane! The first thing he said when he ate them was, "They're more of a chewy than a cookie." All of a sudden, it came to us: Wild Bill Chewies! There you have it, folks, a cookie named after one of the neatest and sweetest guys I have ever known!

Wild Bill Chewies

Ingredients
2 cups Flour
1 Tsp. Baking Powder
1 Tsp. Baking Soda
1/2 Tsp. Salt
2 sticks Unsalted Butter, softened
1 cup Brown Sugar, packed
1/2 cup Sugar
2 Eggs
1 Tsp. Vanilla Extract
2 cups Old Fashioned Oats
1/2 cup Sweetened Coconut, shredded
1 cup Semi-sweet chocolate Chips
3/4 cup Pecans, chopped
7 oz. Caramel Chews, chopped

Directions
Preheat oven to 350 degrees. In a medium bowl, whisk together flour, baking powder, baking soda and salt; set aside.

In a large bowl, beat butter, brown sugar, and sugar until creamy (approximately 5 minutes). Add in eggs and vanilla; beat on low until well blended. Add half of the flour mixture; beat on low until combined. Add the remaining flour mixture and continue to beat on low until combined. Fold in oats, coconut, chocolate chips, pecans and caramels into the dough. - To chop the caramels, unwrap them and using utility/kitchen shears, cut them in half and then in half again to make into smaller pieces.

Spoon dough into tablespoon amounts and drop onto cookie sheets lined with parchment paper. Bake for 13-15 minutes or until browned on the bottom. Let cool and store in an air-tight container for up to 1 week.

Yields: 3 dozen
Source: With a Cherry on Top
Continue reading...

Tuesday, January 19, 2010

Mongolian Beef


Print


Chinese is definitely my most favorite style of take-out, which is probably what you'll see the most of in my Fake-Out Take-Out meals! One thing you may not know about me is that I am super indecisive when it comes to food. I can make decisions all day long about a lot of things, but if food is involved, be prepared to wait a while. A loooong while. I haven't quite put my finger on why, but I think it has something to do with the fact that I love food so much! I'm serious. I think it's because I want to try everything on the menu and being stuck with having to pick just one item to order makes me indecisive. You see, I am that girl who will order something and then decide that I want what someone else is having! I'm also that girl who will "try" things off of everyone else's plates (only of those who I'm close with, of course) just so I can get a taste of everything else that I didn't order!

So, it would come as no surprise that I am quite indecisive when ordering Chinese take-out as well! Trying to decide between General Tso's Chicken, Combination Lo-Mein, Mongolian Beef or Moo Shu Pork drives me (and not to mention everyone else) crazy! But, this past Friday, I was able to set aside my differences with food indecisiveness and I made one of my all-time favorites: Mongolian Beef! It was sweet and spicy and tender and it was darn good!!!

Mongolian Beef

Ingredients
1 lb. Stir-Fry Beef or Flank Steak
1/2 cup Corn Starch
5 Tsp. Vegetable Oil, divided
1/2 Tsp. Ginger, grated
1 Tbsp. Garlic, minced
1/2 cup Water
1/2 cup Soy Sauce
1/2 cup Brown Sugar
3/4 Tsp. Red Pepper Flakes
6 Green Onions, sliced thinly
2 Tbsp. Sesame Seeds

Directions
Pat meat dry with a paper towel and add to a medium bowl.  Add corn starch to meat and toss to coat (ensure that each piece is coated to cook properly).

In a large wok or skillet, heat 1 1/2 Tsp. of oil over med-high heat.  Add the garlic and ginger, stirring until fragrant.  Add in the soy sauce, water, brown sugar and red pepper flakes.  Cook until combined (approximately 2 minutes).  Transfer sauce to a bowl.  - The red pepper flakes add quite a bit of heat to this dish, so use sparingly or omit if you do not prefer spicy food.

Heat the remaining oil in the same pan over high and add the beef.  Cook until browned on all sides.  Pour the sauce back into the pan and cook until it thickens to your desired consistency (approximately 3-5 minutes).  Add in 5 of the green onions, stir, and remove from heat.  Serve over rice and top with remaining green onions and sesame seeds.

Yields: 4 Servings
Source: Adapted from Pink Bites


Continue reading...

Friday, January 8, 2010

Italian Pizza Wrap


Print
I'm always looking for quick, healthy and tasty recipes for lunch.  I tend to get into these habits where I'll find a dish that I love to make for lunch and then after a week or two, I become bored with it.  I find that I need to switch it up often, to make things interesting and keep me excited! 

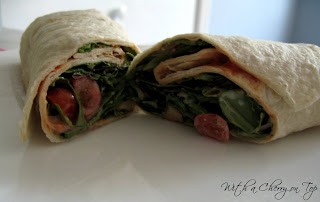
I love lunches that involve Paninis, quesadillas and wraps.  I like to be creative and come up with different and flavorful ingredients to add to these basic and easy carbohydrate bases!  I recently came across a post by another food blogger, Good Things Catered, on my Google Reader.  It was a picture of what looked to be lavash bread or possibly homemade pita with marinara sauce, cheese and a healthy looking salad on top.  It piqued my interest and immediately came to mind as a yummy lunch entree.  I quickly clicked over to her blog to desperately find this recipe to no avail.

So, when desperation mode kicks in, so does my creativity!  I figured, hey, it can't be that hard to make something similar so I searched my brain for a few ideas and with inspiration from Good Things Catered, I came up with my own version: Italian Pizza Wrap.

YUM.  Yep, that's all I can say and I have been addicted ever since!


Italian Pizza Wrap

Ingredients - Pizza Wrap
1 Lg. Flour Tortilla
2 Tbsp. Marinara or Pizza Sauce
1 cup Mixed Greens
1 handful Grape Tomatoes, sliced in half
1 Tbsp. Red Onion, diced
1 Tbsp. Creamy Italian Dressing
2 Tbsp. Parmesan Cheese, crumbled

Creamy Italian Dressing
1/2 cup Mayonnaise
1/3 cup White Vinegar
2 Tbsp. Corn Syrup
1 Tsp. Vegetable Oil
4 Tbsp. Parmesan Cheese, grated
1 clove Garlic, minced
1/2 Tsp. Italian Seasoning
1/2 Tsp. Parsley
1 Tbsp. Lemon Juice

Directions
To make dressing, combine all ingredients in a small mixing bowl and whisk together until a smooth, creamy dressing is formed.  Store in an air-tight container in the refrigerator for up to 1 week.

To make wrap, heat the tortilla in the microwave on high for 20 seconds.  Spoon the marinara on the center of the tortilla and spread it out evenly, making sure to leave 1/2" uncovered around the edge.  In a small bowl, combine the mixed greens, tomatoes and onion.  Add the dressing and toss to coat.  Spoon the mixture on top of the marinara and add the cheese.  Carefully fold one end of the tortilla in towards the center and then fold the right side of the tortilla in, pulling all of the ingredients towards you to make the wrap tight and keep the ingredients in tact.  Gently roll the tortilla to make a wrap and serve immediately.


Source: Inspired by Good Things Catered
Continue reading...

Thursday, January 7, 2010

Creamy Shrimp & Pasta


Print
One of my dreaded weekly chores includes planning our dinner menu for the week and making up a grocery list.  I dislike it.  A lot.  Almost as much as I dislike doing laundry.  But, it's a necessity in order for us to stay on budget and it helps with my sanity of not having to figure out what I'm going to make for dinner each night (instead, I'm just crazy for about 4 hours every Sunday figuring our menu for the week)! 

I found this week to be incredibly difficult, especially now that we're approaching a new year.  As with most normal Americans, we're faced with the challenge of resolutions and that infamous one of losing weight with the attachments of eating healthier meals and exercising.  With that in mind, I was trying to also plan our menu by utilizing and using up some of the items we already have (another budget saver).  I knew that I wanted to make a shrimp entree of some sort because we had quite a bit of it in our freezer and shrimp is health, right?  Right.  But, for some reason when I think of shrimp, I think of pasta.  I don't know why but I just love shrimp paired with pasta and trying to come up with a semi-healthy meal including pasta can be a challenge in itself because pasta is just SO much better when it's loaded up with cream and cheese!

I came across a recipe that I believe actually came from Kraft, which inspired me to make this meal.  While I'll admit, it does have cheese in it, we paired it with a nice green salad to balance it out and I guess for psychological purposes, make me feel better about it!  We have been eating very well during the day and one meal with a little cheese can't hurt, right?!  This dish was so yummy.  In fact, I was trying to take pictures of it to post on here and I couldn't help myself from going back and forth to the stove and grabbing a forkful of it.  It was that good.  Honest.


Creamy Shrimp & Pasta

Ingredients
1 lb. Shrimp, shelled and deveined
2 Tbsp. Kraft Parmesan Basil Vinaigrette with Olive Oil
1/4 cup Pasta, uncooked
1 cup Grape Tomatoes, quartered
2 Tbsp Light Cream Cheese
1 Tsp. Basil
2 Tbsp. Parmesan Cheese, crumbled

Directions
In a small bowl, pour the dressing over the shrimp and let marinate, covered, in the fridge for 15-20 minutes.  Meanwhile, cook pasta as directed on package.

Heat a large skillet on med-high heat; add the shrimp mixture and cook 3-5 minutes or until pink.  Remove the shrimp from the skillet with a slotted spoon and set aside.  Add the tomatoes, cream cheese and basil to the marinade in the skillet and cook, stirring frequently, 3 minutes or until blended well.  Add shrimp and cook until heated through, stirring occasionally.

Drain pasta and add to the skillet with the shrimp and cream mixture.  Toss gently to coat and sprinkle cheese on top.  Serve immediately. 

Source: Adapted from Kraft
Continue reading...

Wednesday, January 6, 2010

Pork Loin with Peach Marmalade Sauce, Collard Greens, Black Eyed Peas & Mexican Cornbread


Print
Happy New Year!!!  2009 seemed to go by rather quickly for us and certainly had its ups and downs.  But it's a new year and we're anxiously anticipating what is to come in our lives within the next 12 months!
As many of you know, I'm a "Yankee" girl from West Michigan and recently moved to the South for Chris to pursue a great opportunity with a new company.  What you may not know is that Chris is a true southern boy - born and raised in sweet-home Alabama!  Living in the South has definitely provided me with new experiences (mostly good)!  With that, though, comes Southern cooking and Southern traditions.  Today is New Year's Day and it's certainly a day filled with traditions and superstitions; I feel it's necessary to abide by them 1). Because I'm with a Southern boy and it's "a must" and 2). I'm very superstitious!  Let me indulge you....Never wash clothes on New Year's Day because if you do, you'll wash someone out of your life...If your house isn't clean at the beginning of the year, it won't be clean all year long...Whatever you're doing on the first day of the year, you'll be doing all year long! 

The most popular of them all....One must eat collard greens and black eyed peas if they want a year full of wealth.  Collard greens represent the money you'll have and the black eyed peas represent the pennies or coins.  Today, our house is filled with the aroma of smoked pork, onions and garlic...yum!  I am learning how to make these items and also taste them for the first time with the hopes that I will be pleased with their Southern flavors and the wherewithall to make them in the future!  Our menu consisted of a Roasted Pork Loin with a Peach Marmalade Sauce, Collard Greens with garlic and spice, Black Eyed Peas, and Mexican Cornbread. 

After sitting down to a nice, warm meal, I found myself going for seconds on the Collard Greens and Black Eyed Peas - they were delicious and to my delight, tasted much different than I had imagined!

Peach Marmalade Sauce

Ingredients
1 cup Peach Preserves or Marmalade
2 Tbsp. Dijon Mustard
1 Tsp. Cumin
1/4 Tsp. Chili Powder

Directions
Combine all ingredients in a small saucepan over med-high heat, stirring frequently.  Cook until heated through (approximately 3-4 minutes).  Adjust ingredients and their amounts according to taste.  Serve immediately over meat or poultry.

Source: With a Cherry on Top


Black Eyed Peas

Ingredients
1 lb. Black Eyed Peas
1/2 lb. Smoked Ham, diced
1 Lg. Onion, diced
1 Tbsp. Garlic Powder
1 Tbsp. Zatarain's Crab Boil Seasoning
1 16 oz. can Diced Tomatoes
3 cups Water
Salt
Pepper

Directions
Carefully sort through black eyed peas, tossing out the bad ones. 

In a large pot, combine all ingredients and cook for 1 1/2 hours on low heat.  Turn the heat down and simmer for 30 minutes more.  Remove from heat for 30 minutes to thicken and then simmer for an additional 45 minutes.  Add salt and pepper to taste.  Serve immediately.

Source: With a Cherry on Top


Collard Greens

Ingredients
1 Lg. bunch of Collard Greens, rinsed and stems removed
1 1/2 lb. Ham Hock
5 qt. Water
2 Tbsp. Garlic Powder
2 1/2 Tbsp. Zatarain's Crab Boil Seasoning
2 Tbsp. Sugar
Pepper

Directions
In a 8 qt. pan, combine all ingredients except the collard greens and bring to a boil over high heat.  Boil for 20 minutes, then reduce heat to medium and cook for 2 hours, stirring occasionally.  Add collard greens and simmer for 75 minutes, stirring occasionally.  Season with pepper to taste.  Serve immediately.  - Note: we like our food spicy, so if you don't, it is recommended that you cut back on (or omit) the crab boil seasoning.

Source: With a Cherry on Top


Mexican Cornbread

Ingredients
1 pkg. Mexican Cornbread mix
1 Egg
3/4 cup Milk
4 Tbsp. Jalapenos, sliced
1 lb. Cheddar Cheese, shredded

Directions
Preheat oven to 350 degrees.  In a medium bowl, combine cornbread mix, egg, milk, jalapenos and 1/2 lb. cheese.  Mix together and pour into 9x9 greased dish.  Sprinkle remaining cheese over top of mixture and bake for 20 minutes or until cheese browns.  Serve immediately.  - Note: we like our food spicy; if you do not, it is recommended that you decrease the amount of jalapenos used or omit them altogether.
Source: With a Cherry on Top
Continue reading...

Chocolate & Orange Macaroons


Print
I have never made macaroons before.  To be honest, I was a little intimidated by them.  They seem like such a fancy little delectable treat that I surely did not have the skills to make.  Wrong!  I made macaroons today.  I successfully made macaroons today.  I don't know for sure, but I believe, I came across a similar recipe from a cooking magazine of some sort owned by my lovely mother!  Whenever I visit my parents, I always thumb through her latest cooking magazines and grab the recipes that inspire me the most to add to my repetoire.  I must've figured that someday, I would be venturous enough to make macaroons!

As I was planning my weekly menu earlier this week, I was browsing through my collection of dessert recipes contemplating what goody would satisfy my sweet cravings for the week.  Then I came across this recipe and I knew I had found "the one." 

I will be the first person to admit when I'm wrong, so let me just say, I was wrong.  Macaroons are by far one of the easiest desserts I have ever made and this version is one of the tastiest I have ever had!  While baking, the house filled with the aroma of sweetness and oranges!  When they came out, they were perfect little coconut puff balls, crispy on the outside and chew in the middle.  The combination of orange and chocolate was enough to put me over the edge.  Seriously....you gotta try these!

Chocolate & Orange Macaroons
Print This Recipe

Ingredients
2 cups Sweetened Coconut Flakes
2/3 cup Sugar
1/4 cup Flour
1 Tsp. Orange Zest
1/8 Tsp. Salt
2 Egg Whites
2 Tbsp. Unsalted Butter, melted
1/4 Tsp. Almond Extract
1/2 cup Semi-Sweet Chocolate Chips

Directions
Preheat oven to 350 degrees. 

In a large bowl, whisk together coconut, sugar, flour, zest and salt.  Stir in egg whites, butter and almond extract.  Fold in chocolate chips.

On parchment lined baking sheets, place rounded tablespoon-sized balls of dough approximately 2" apart.  Bake for 20 minutes or until they are firm to the touch and lightly browned on the bottom.  Let cool before serving.  - Gently roll the balls of dough for a more uniform shape.

Makes approximately 20 cookies.

Source: With a Cherry on Top
Continue reading...

Things I ♥ ...The Hip Hostess Aprons


Print
There are definitely items (cooking-related) that I would love to have, but there is one thing, regretfully, that I do not have enough of and that is aprons!  I do so much more cooking and baking now that I stay at home and truth be told, I'm not exactly the cleanest when it comes to food!  I'm not a slob by any means, but most of my friends and family will tell you that they recommend I wear a bib when eating.  The same applies to my cooking skills.  I always, always find a way to get something splattered, spilled, dumped, or wiped on me.

I finally decided that it was time that I start saving my clothes from my kitchen disasters and work on building a collection of aprons to wear.  My first purchase of the year: an Avocado a la Mode Sheath Apron from The Hip Hostess!  I'm not sure how or where I came across this site (I believe it was through another foodie), but seriously, these aprons are the cutest things ever.  Ever.  It's a mother-daughter duo and they have definitely brought "hip" back into the kitchen.  There are different styles and patterns to choose from and you can even buy them for your little kiddos or wanna-be bakers like yourself!  With other cute items such as towels and magnets to match, you really cannot lose.  In fact, I see some unique and fun gifts for my "Susie Homemaker" friends in the near future!

I mean really, how cute is this apron?!  It's almost too cute to cook in!


Continue reading...
 

With a Cherry on Top Copyright © 2009 Designed by Ipietoon Blogger Template In collaboration with fifa
Cake Illustration Copyrighted to Clarice