Pages

Wednesday, March 2, 2011

What's Baking Round-Up...Baked with ♥


Print

As you may (or not) recall, this month, I was the host for our monthly What's Baking group.  Because it's February, I opted to go with a "love" theme....as in, Baked with Love!

The theme, itself, was quite open for interpretation as long as the recipe was something that would hold up well in a Valentine's menu.  To my pleasant surprise, many people went outside the realm of baking "themed" treats for the holiday and chose recipes that reminded them of their loved ones.  I am so glad that there were so many different ideas brought to the table this month and am thrilled to show y'all the variation of directions that everyone went in with this particular challenge!

So, without further ado, here are the entries for this month (in no particular order)....

Stuffed Red Velvet Cupcakes with 
Cream Cheese Frosting
Source: Our Italian Kitchen


 Vanilla Cupcakes


Red Velvet Cupcakes


Triple Chocolate Espresso Brownies
Source: Blissfully Delicious


Coconut Drop Cookies
Source: JBean Cuisine


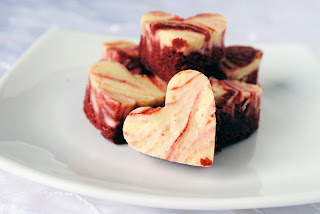
Red Velvet Cheesecake Bites
 Source: Our Share of the Harvest 


Alice's Chocolate Chip Cookies
 Source: The Boys Made Me Do It


Flourless Chocolate Hazelnut Cookies
Source: Pursuing Domestic Goddess-ness


Vanilla/German Chocolate Cake Cupcakes
with Oreo Bottoms
Source: She Cooks and Bakes!


Mint Oreo Fudge
Source: I was Born To Cook


Mixed Berry Cobbler with Cornmeal Crust
Source: Adventures In My Kitchen


Strawberry Cupcakes


Cinnamon Rolls
 Source: The Mess Pot


Brownie Pudding
Source: Cloud 8 1/2


Triple Layer Oreo Cake
Source: Beantown Baker


 Chocolate Dipped Strawberry Cakeballs
 Source: The Jey of Cooking


Chocolate Strawberry Tartlets
Source: Brownies and Blondies


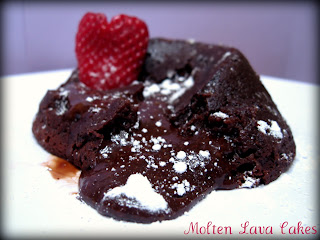
Molten Lava Cakes
Source: With a Cherry on Top


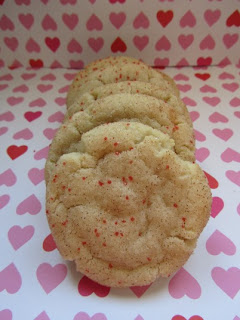
Snickerdoodles
Source: Carrie's Sweet Life

Be sure to stick around and see next month's challenge....Amanda, from Our Italian Kitchen, is the host for March!  The theme she has chosen is Bake From Your Nationality/Heritage, in honor of St. Patrick's Day!  I wonder what everyone will make?!
Continue reading...

What's Baking....Baked with Love


Print

So for this month’s What’s Baking challenge, I was the hostess with the mostess and because it was February, the month of love, I chose a theme based around just that….LOVE! 

We all did something “Baked with Love” and I was hoping that it would be interpreted in a few  different ways – not only did I feel it would be great to center it around Valentine’s Day, but to also choose recipes that, perhaps, meant something to someone or was a reminder of someone special in their life!

I chose to go the first route and made something very appropriate for V-Day…something I love seeing on a Valentine’s menu and something, actually, that I’ve never made before: Lava Cakes!

Chris and I both love the chocolatey goodness  that these cakes hold…the ooey-gooey center is what makes them so darn special!  To my pleasant surprise, they were really easy (probably one of the easiest desserts I’ve ever tackled).  But being a newbie, something went wrong (maybe I didn’t cool them long enough), but they deflated once I removed them from the ramekins….hence, deflated looking cake in the picture!
But don’t let that stop you….the deflation these babies went under had absolutely no effect on the taste!  They were deee-licious!


Molten Lava Cakes
Ingredients
1/2 cup Unsalted Butter
Cocoa Powder
4 oz. Semi-Sweet Chocolate
2 Eggs
1/4 cup Sugar
Pinch of Salt
2 Tsp. Flour

Directions
Preheat oven to 425 degrees.  Butter the inside of two ramekins and dust the insides with cocoa powder (to prevent the cakes from sticking).

In a double-boiler or bowl sitting atop a pan of simmering water, melt the butter and chocolate over medium heat, stirring frequently; let cool.

In a large bowl, beat together the eggs, sugar and salt until the sugar dissolves (about 1 minute).  With the mixer on low, slowly add in the chocolate mixture until incorporated into the egg mixture.  Add in the flour and mix to combine.

Carefully divide the batter between the two ramekins and place on a baking sheet.  Bake for 8 minutes and remove.  Let cool slightly and gently slide a butter knife around the inside of the ramekin to remove the cake.  Serve with whipped cream, a dusting of powdered sugar or fresh fruit!

Yield: 2 Servings
Source: Adapted from Made in Melissa's Kitchen, originally from Allrecipes
Continue reading...

Monday, February 21, 2011

Menu Madness - Week of 2.20.11


Print

So last week's menu was really good!  Unfortunately, I didn't have great lighting to get decent shots to post, so there won't be any posts from much of last week.  I will say that the Mustard-Roasted Fish (from Ina) was really good and the Maple-Roasted Butternut Squash  (also from Ina) was phenomenal!  Holy cow, I cannot believe I've never made it before, but it was SO GOOD! 

Because we both loved it, it will definitely be finding it's way on the menu again (probably sometime soon) so I'll do my best to get some good pictures and post the recipes.  But you can also find the recipes in Ina's Barefoot Contessa: Back to Basics cookbook.  If you don't have this one, it's definitely worth keeping in your repertoire...it's a good one!

Last week was the first time Chris has tried couscous so that will definitely be making it's way into our menus more and more; it's a nice, healthy alternative to pasta and rice!  And this week, will be all new recipes so stay tuned! 

Have a great week!
Continue reading...

Wednesday, February 16, 2011

Valentine's Cake Batter Candy Bark


Print


Whew, that's a mouthful if I don't say so myself!  Valentine's Cake Batter Candy Bark....say that 5 times fast!

Well, I'll tell you the story behind this bark.  For a while now (pretty much since she posted it), I've had my eye on Stephanie's (Stephanie Cooks) Cake Batter Bark.  Seriously, it looks sooooo good and who doesn't love cake batter?!  It's, like, one of my favorite things and definitely one of my favorite ice cream flavors!

So I thought that this would be such a great treat to make for Chris to take into work to share with his co-workers.  I had planned on this and Red Velvet Cupcakes.  That was, of course, until Bridget (Bake at 350) had to go and make her version of bark, which was appropriate for the occasion what with the cute little sprinkles and conversation hearts she tossed on it!

And then I was torn....do I make the yummy cake batter flavored version, which I know will be good because, hello, it's cake batter!  Or do I make the version that has crunchy rice krispies mixed into the batter making it a pseudo "Crunch Bark?"  Get it?!  Crunch Bark = Crunch Bar....I kill myself!

Anywho, the light bulb finally went off and what better way to win this argument in my head than to combine the two recipes...it was, literally, the best of both worlds.

I have to say it was pretty darn good, but I was rather disappointed in the lack of cake batter flavor.  I guess I was expecting it to stand out more but I guess I'll have to put more in next time.  All in all, it was good and definitely worth making again.  But be warned....this stuff will definitely suffice a killer sweet tooth!  It is very sweet and probably something you shouldn't give to already hyper children...just saying.


Valentine's Cake Batter Candy Bark


Ingredients
2 - 12oz. bags of White Chocolate Baking Chips
2 - 12oz. bags of Semi-Sweet Chocolate Chips
6 Tsp. Yellow Cake Mix
2 cups Rice Krispies
Conversation Hearts
Sprinkles

Directions
Using a double boiler or sauce pan with heat-safe bowl on top, heat water over med heat until it comes to a simmer.  Add the white chocolate in the bowl and stir, continuously, until melted.  Stir in the cake mix and then gradually add in the rice krispies; mix until the each rice krispie is coated in chocolate.  Carefully spread the mixture out onto a large piece of parchment paper and let cool.

Meanwhile, melt the chocolate chips utilizing the same method above (minus the cake mix and rice krispies) and carefully spread the mixture over the cooled white chocolate mixture.

Sprinkle on the sprinkles and conversation hearts and let cool completely.

Once it's cooled, break the bark into pieces and enjoy!

**I've increased the amount of yellow cake mix above (I originally used 3 Tsp, but I think doubling it may do the trick).  Also note, that this is very versatile and any type of candy/sprinkles can be used!

Source: Adapted from Bake at 350 and also adapted from Stephanie Cooks
Continue reading...

Monday, February 14, 2011

Red Velvet Cupcakes


Print

Happy Valentine's Day!  Today is one of the most love-filled days with weddings, romance, flowers, candy and let's not forget yummy desserts!

Red Velvet is a classic go-to idea for this special occasion as it's festive color lends itself well to the vibrant shades of red and pink!  I know it probably seems like a cop-out to go with red velvet on this day, but I have to say I do love the flavor combination of the cocoa-esque cake combined with the rich, cream cheese frosting!  It was clearly a no-brainer for me as I've been craving them for a while now!

So one blog, in particular, I really enjoy following...she's a friend on an online cooking/baking community that I belong to and one of the reasons I love her blog so much is that she does these incredible comparisons!  Every once in a while, Bridget, from The Way the Cookie Crumbles, goes on a whim and compares some of the top-rated recipes for a particular item.  I think her sugar cookie comparison is, by far, my favorite!  But when it came to making red velvet cupcakes this time around, I wanted to do something different than my normal go-to family recipe (passed down by my Great Aunt Linda).  But there are so many out there and it was hard to choose, which drew me to Bridget's blog as I was 99% positive that she would have a red velvet comparison!

Sure enough, she did!  She actually took the time to compare 5 different recipes.  Seriously, if y'all have never seen her comparisons, you need to venture over there and check them out.  They really are fantastic and she is so thorough that even if you don't want to go with her top pick, you have enough information on the other recipes to decide which one would be best for you.

Anywho, she compared 5 recipes (all very popular among our foodie community) and chose Kelsey's version of Saveur's Red Velvet Cake (Kelsey is another friend of ours, from Apple a Day) as her favorite recipe.  So I decided to give it a shot....

This recipe was good, but if I may be honest, I will say that I much prefer my Aunt's recipe!  The texture of Kelsey's was really nice; they were moist and really baked up well.  But there was something missing with the flavor and I'm not sure what it was.  I followed the recipe to a "tee" but I think that the flavors of my Aunt's recipe are a little more predominant, which is why I love them!  For me, I like that cocoa flavor to come through a little more (and for some people, they'd rather not).  I know it's a personal preference just like some people hate red velvet!

I think I would make this recipe again; however I would tweak it a bit more to let that flavor shine!  All in all, it's definitely a keeper just not my favorite (sometimes you just can't beat a good ol' family recipe)!


Red Velvet Cake


Ingredients - Cake
2½ cups Flour
1½ cups Sugar
1 Tsp. Baking Soda
1 Tbsp. Cocoa Powder
1 Tsp. Salt
2 Eggs
1½ cups Vegetable Oil
1 cup Buttermilk
2 Tbsp. Red food coloring
1 Tsp. Vanilla Extract
1 Tsp. White Distilled Vinegar

Ingredients - Frosting
1 - 12oz. pkg. Cream Cheese, softened
1 1/2 cups Unsalted Butter, at room temperature
1½ Tsp. Vanilla Extract
3 cups Powdered Sugar

Directions

Preheat oven to 350 degrees.

Sift together the flour, sugar, baking soda, cocoa, and salt into a medium bowl.

In a large bowl, beat the eggs, oil, buttermilk, food coloring, vanilla, and vinegar until well combined. Add in half of the dry ingredients and beat until smooth; add in the remaining dry ingredients and continue beating until the mixture is smooth (about 2 minutes).

Divide the batter evenly between 3 8-inch round cake pans, greased and floured.  Bake, rotating halfway through, until a toothpick inserted in the center of each cake comes out clean (about 25-30 minutes).

Let the cakes cool 5 minutes, then invert each onto a plate, then invert again onto a cooling rack. Let cakes cool completely.

**For cupcakes, divide the batter into cupcake liners inserted into a cupcake tin.  Bake until a toothpick inserted int he center comes out clean (about 18-22 minutes).

To make the frosting, beat together the cream cheese, butter and vanilla together in a large bowl until combined well.  Gradually add in the powdered sugar and continue beating until the mixture becomes light and fluffy (about 5 minutes).

Put 1 cake layer on a cake plate, level off with a serrated knife, and spread one-quarter of the frosting on top. Set another layer on top, level, and repeat frosting. Set remaining layer on top, level, and frost top and sides with a thin crumb coat layer; repeat with a second layer of frosting and decorate as desired.

Chill for 2 hours to set frosting.

**For cupcakes, divide the frosting recipe by 1/4 as you won't need that much!

Yield: 1 8-inch, 3-layer cake or 20 cupcakes
Source: Adapted from The Way the Cookie Crumbles, from Apple a Day (originally from Cake Man    
             Raven)
Continue reading...

Sunday, February 13, 2011

Menu Madness - Week of 2.14.11


Print
 Here it is...the menu for the week!  Yes, the Mustard-Roasted Tilapia is still on there and no, I have not made it yet!  That's what happens when things come up during the week, but that's also the beauty of planning a weekly menu: you can just push it out to the next week and not worry about it!  It will get made this week and I'm really excited to try it as both it and the Maple-Roasted Squash recipe come from Ina Garten, who never disappoints in the kitchen!

Other than that, it's a pretty easy week of cooking!  I'm trying to utilize some of the same ingredients and leftovers for a couple of meals, which will not only save on time, but on money as well!

Tomorrow is Valentine's Day and I'll be in the kitchen today whipping up some goodies: Red Velvet Cupcakes, Valentine's Candy Bark (with a twist) and Homemade Granola with dark cherries, almonds and dark chocolate...YUM!

Have a great week everyone!
Continue reading...

Wednesday, February 9, 2011

Queso Dip


Print

I think it's pretty safe to assume that I do a majority of the cooking in our house.  But don't be fooled - Chris is an excellent cook and he definitely has his specialties.  For instance, his scrambled eggs - they are so good and the first time I came to visit him (we did the long-distance thing for a year), he made these for me in the morning and I never forgot them!

And let's talk about his catfish, shall we?

Being in the South, you can find catfish just about anywhere for lunch or dinner (it's a staple menu item at most places).  The thing is, it's always fried.  Don't get me wrong, fried is good.  Fried is VERY good, but it's not always the best for you and some places have a really heavy hand with their breading and I'm not much of a fan (neither is Chris).  But where he grew up in Alabama, grilled catfish is easier to come by and I gotta tell y'all, it is so, so good!  And when Chris makes it?  Oh lord, it's heaven!  It melts in your mouth and it's so tender.  We'll definitely have to add that to the list of blogging this Summer (we eat it a lot)!

And then there's his Queso Dip.  The infamous dip that is always requested for him to bring to gatherings of all kinds.  When we first started dating, he bragged about this dip and I thought, "Yeah, yeah, just another dip with Velveeta and salsa...no biggie!"

Well, yes, it does have Velveeta in it, but it doesn't have salsa and it's SO much better than any homemade queso I've tried thus far!  I know I'm a little bias, but I'm being honest here....it's really good!  It's one of those dips that you just can't.stop.eating.  No matter how hard you try, you just have to go back for one more chip.  And then one more.  Annnnnddd then one more.  Okay, I'm done!

Because we're trying our best to eat better these days (kind of hard to do with ribs and queso, but it was the Super Bowl), we opted to use ground turkey instead of beef.  Chicken would be exceptionally good in this as well!  And just like most of the recipes on here, you can really alter the heat to your liking.

 Queso Dip

Ingredients
1 lb. Ground Meat (Turkey, Beef or Chicken)
1 Med. Onion, diced
1 Lg. brick Velveeta Cheese
1 - 10 oz. can Diced Tomatoes with Lime Juice & Cilantro (we use Rotel)
1 - 10 oz. can Diced Tomatoes with Green Chiles (we use Rotel)
2 - 15 oz. cans Pinto Beans, drained and rinsed

Directions
In a large pan, cook the meat over med-high heat until browned.  Add in the onion and cook until tender.

In a large crock pot, add in the meat, cheese, tomatoes and beans; stir to mix.  Cook over low-medium heat for 2 hours or until heated through.

Serve immediately with tortilla chips, sour cream, lime, cilantro...whatever you want!

Yield: 12-14 Servings
Source: With a Cherry on Top Original
Continue reading...
 

With a Cherry on Top Copyright © 2009 Designed by Ipietoon Blogger Template In collaboration with fifa
Cake Illustration Copyrighted to Clarice