Pages

Monday, December 13, 2010

Zuppa Toscana


Print

If one were to question whether Winter had arrived yet in Georgia, they need not question it any longer!  It was frigid and down-right freezing here over the weekend and we saw snow fly! 

Now, being a "Yankee" myself, snow and frigid temperatures are nothing out of the ordinary for me at this time of year (especially since my family has already seen blizzard-like conditions where they live).  But when you live in the South, especially getting down past Tennessee and Kentucky, you would expect that you've escaped that horrible weather!  Well let me assure you...that's a big fat NO!

But what is December without being a little cold and seeing Mother Nature's frozen little stars falling from the sky?!  And what better way to celebrate weather like that than to curl up to a nice bowl of homemade soup?!  I'll do you one better, how about a nice bowl of Zuppa Tuscana from Olive Garden?!  And even better than that...a bowl of Zuppa Toscana homemade from your own kitchen!

Olive Garden: home of the infamous soup, salad and breadsticks special.  One that I know I officially partook in plenty of times at lunch gatherings!  As always, I feasted on the yummy salad with homemade Italian dressing, buttery garlic breadsticks and piping hot Zuppa Toscana with chunks of potatoes, spicy sausage and fresh kale in a creamy broth....YUM!  Seriously, if you've never tried it, you must go and get some.  Now!  I really mean now!!!

Surprisingly, Chris had never had it, but that's because when he goes to Olive Garden, he orders pasta.  Hmmm...who would've thought?!  So to my delight, he was pleasantly surprised after trying this hearty soup and even took some for lunch today!  As one of my definite favorites, this soup will surely be greeted with big open arms in our house again (probably sooner than we think)!


Zuppa Toscana

Ingredients
1 lb. Italian Sausage
8 slices Bacon, chopped
4 cups Water
2 cups Chicken Broth
2 Lg. Potatoes (Yukon, Russet, Baking, etc.), cubed
1 Med. Onion, diced
4 cloves Garlic, minced
2 cups Kale, chopped
1 cup Heavy Cream
Salt to taste
Pepper to taste
1/2 Tsp. Red Pepper Flakes (optional)

Directions
In a large pot, crumble the sausage and brown over medium heat.  Add in the bacon and cook, stirring frequently, until browned; drain the grease from the pot.

Add in the water, chicken broth, potatoes, onion and garlic.  Cook over medium heat until simmering; let simmer until the potatoes are fork-tender (about 10-15 minutes).

Add in the kale, cream, salt, pepper and red pepper flakes; stir until combined and cook until heated through.  Serve immediately.

Note: The red pepper flakes definitely add a bit of heat to the soup, so use sparingly if you prefer less or omit altogether.


Yield: 4-6 Servings
Source: Adapted from Joelen's Culinary Adventures, originally from America's Most Wanted Recipes
Continue reading...

Tuesday, December 7, 2010

Starbucks' Pumpkin Scones


Print

Have y'all been to Starbucks and had their Pumpkin Scones?!  They're heavenly and with a Pumpkin Spice Latte (especially with Autumn's first sign of arrival), it's pumpkin overload, but in a good way!  A really good way!  I don't know if I've ever talked about my Starbucks craziness or my little method of how I choose my drinks from there, but I'll keep it short....

When it gets to be the time of year that Autumn is arriving, I always go for the Pumpkin Spice Latte (and sometimes treat myself to the decadent Pumpkin Scone or the low fat Banana Chocolate Chip Coffee Cake, which is also scrumptious).  Then, as Fall moves out and Winter quickly approaches, my  mind goes directly to the Peppermint White Mocha, which is oh so good!  Any other time of the year, my go-to drink is just a regular White Mocha but when it's my favorite time(s) of the year, I splurge and get something special!

Sorry, I digress a little.  Back to the scones....I came across this recipe, I don't know, quite some time ago and had it bookmarked on my computer ever since.  I've made pumpkin scones before...remember these?  They were good, but nothing beats the ones from Starbucks.  There are so many copycat recipes out there (and I've tried a few), but they don't always meet your expectations of the real thing.  This recipe, however, was quite the opposite.  These scones turned out exactly like Starbucks' and the sugary white icing drizzled over them was the cherry on top...haha, get it?!

I actually made mini-scones because, along with the Cranberry Soda Bread with Lime Glaze and the Mini- Zucchini & Basil Quiches, I took these into work for Black Friday.  I figured it would be easy to grab a small one versus a much larger one and they went a lot further and saved me time from having to make duplicate batches of scones just to feed everyone!  They're great in the morning with coffee or tea and sometimes I even found myself snacking on them in the evening just to curb my sweet tooth!

Starbucks' Pumpkin Scones

Ingredients
2 cups Flour
7 Tbsp. Sugar
1 Tbsp. Baking Powder
1/2 Tsp. Salt
1/2 Tsp. Ground Cinnamon
1/2 Tsp. Nutmeg
1/2 cup Canned Pumpkin
3 Tbsp. Heavy Cream
1 Egg
6 Tbsp. Unsalted Butter, cold and cubed
1 cup plus 1 Tbsp. Powdered Sugar
2 Tbsp. Milk

Directions
Preheat oven to 425 degrees.

In a large bowl, whisk together the flour, sugar, baking powder, salt, cinnamon and nutmeg; set aside.

Meanwhile, in a medium bowl, whisk together the pumpkin, heavy cream, and egg.

Crumble the butter into the dry ingredients until it resembles a coarse mixture.  Fold the wet ingredients into the dry ingredients. 

Using your hands, for the dough into a ball.  Pat the dough lightly onto a floured surface and form a 1-inch thick rectangle (9-inches long and 3-inches wide).  Using a large knife or pizza cutter, slice the dough twice through the width, making three equal portions.  Cut those pieces diagonally so that there are 6 triangles of dough (I took it even further to make smaller, mini-size pieces).

Bake on a parchment lined baking sheet for 14-16 minutes or until light brown; let cool completely.

To make the icing, combine the powdered sugar and milk in a small bowl; mix well until no lumps are present.  Using a spoon, carefully drizzle the icing over the scones and let sit for at least 1 hour.

Yield: 6 Servings (full size)/24 Servings (mini)
Source: Adapted from The Nest
Continue reading...

Monday, December 6, 2010

Cranberry Soda Bread with Lime Glaze


Print

I'm not a big "bread" person in terms of actually baking bread.  I don't know, it sort of scares me!  I've made homemade bread before and it always just turns out alright.  It's never anything special, but it's certainly not horrible either.  I've just always envisioned homemade bread as being really, really good.  And the times that I've had it, it is!  This is definitely a cooking hurdle I need to get over and I'm working on it. 

I think, more than anything, it's working with yeast that scares me.  Making bread can be a delicate process; there are a lot of steps in between to let the bread rise (sometimes more than once) and kneading it just so.  For one reason or another, mine usually comes out dry.

This recipe I actually consider a "cheater" recipe in that it doesn't utilize yeast.  It's quite simple and ends up coming out as a cross between a scone and biscotti.  It has a hard shell on the outside, but is rather dense on the inside.  I made this recipe for work on Black Friday.  I thought it would be a nice little "something" to help fill us up but also kill our sweet cravings!

The bread itself was pretty good, although it did seem a little dry (not too bad), but I might've overbaked it as well (again, if you've followed any of my other Turkey Day/Black Friday posts, you'll know that I had lots going on in the oven and some things ended up staying in there too long)!  And I missed a step in the process to help vent it and let steam escape during baking.  It certainly didn't ruin the flavor and the best part of this recipe is the lime glaze!  Holy smokes, people, I'm telling you that I could not keep my hands off of the glaze once I was done using it on the bread.  It was so good and just that hint of lime was really refreshing and such a nice complement to the somewhat sweet, yet somewhat tart cranberries in the bread.  It was a really  nice combination and if I make it again, I will definitely be sure not to overbake it!  I think this bread would be great for a bridal or baby shower of some sort or perhaps a brunch!

Cranberry Soda Bread with Lime Glaze

Ingredients
1 1/3 cups plus 1 Tbsp. Milk
1 Tbsp. Lemon Juice
4 cups Flour
1 1/2 Tsp. Baking Soda
1 Tsp. Salt
3 Tbsp. Unsalted Butter, chilled and cubed
1 cup Dried Cranberries
1 Egg
1 cup Powdered Sugar
1 Lime, zested and juiced

Directions
Preheat oven to 425 degrees.  Line a baking sheet with parchment paper.

In a small bowl, whisk together 1 1/3 cups milk and the lemon juice; let it sit at room temperature for 10 minutes.

In a large bowl, combine the flour, baking soda and salt.  Rub in the butter until coarse crumbs form.  Stir in the cranberries.

Beat the egg into the milk mixture and then add to the flour mixture, mixing until just combined.  Transfer the dough to a lightly floured surface and knead until it just comes together.  Form the dough into an 8-inch round and place on the prepared baking sheet.  Using a knife, score an "X" 1/2-inch deep in the center.  Bake until golden and crusty (about 25-30 minutes).  Let cool completely.

Meanwhile, in a medium bowl, combine the powdered sugar, lime zest, lime juice and the remaining tablespoon of milk.  Drizzle over the cooled bread and slice for serving.

Yield: 8-12 Servings

Continue reading...

Friday, December 3, 2010

What's Baking Challenge - Thanksgiving


Print

Well, it's that time again and I can hardly believe we're already rounding up recipes from last month's What's Baking Challenge (it seems like just about a week ago, we were doing our first round up for October).  Wow, how time flies!

This was an interesting month because it was about Thanksgiving and it was really nice to see everyone's interpretations of the theme and what reminded them of this special holiday.  It was also nice to see a wide variety of baked goods made and not just desserts! 

Below are the entries from most everyone (I know that some people stepped out for the month due to time commitments)...hopefully you'll find something that catches your eye and also some other blogs that may be of interest to you!

And before I go, our host chosen for December is Stephanie from Brownies and Blondies.  The theme she has chosen is Holiday Colors!  I think it will be really fun to see how everyone interprets it and whether they stick with the typical red and green for Christmas, blue and white for Hanukkah, red/green/black for Kwanzaa, black and gold for New Years Eve, a simple red and white combination or maybe even something Wintry in light blue/silver/white!  Stay tuned next month to find out....


Edible Cornucopia


Source: Our Italian Kitchen


Rustic Apple Crostata


Source: The Boys Made Me Do It


Pumpkin Cranberry Pecan Upside Down Cake


Source: Beantown Baker


"The Pie That Won't Die"


Souce: The Tiny Tyrant's Kitchen


Cranberry Apple Mini Pies


Source: Hezzi-D's Books and Cooks


Sweet Potato Trifle


Source: Carrie's Sweet Life


Bacon and Cheddar Apple Pie


Source: The Jey of Cooking


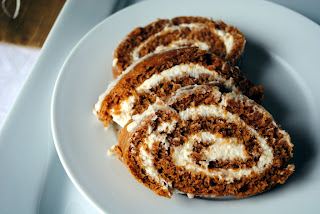
Pumpkin Roll with Cream Cheese Filling


Source: Our Share of the Harvest


Pilgrim Bread


Source: Pursuing Domestic Goddess-ness


**For what it's worth, please excuse the formatting above with the caption sourcing of the pictures.  Blogger isn't working with me the way I'd like and for some reason some of the captions are not properly placed under each picture.  I'll keep working on it to hopefully get it fixed!


Continue reading...

Thursday, December 2, 2010

Mini-Zucchini & Basil Quiche


Print

We all know that Black Friday happens to be the craziest and busiest shopping day of the year.  I never, let me repeat, never go out that day! 

But unfortunately, my streak of not going out on Black Friday ended this year.  You see, I picked up a part-time job this Fall to help get me out of the house, meeting new people here and just having something to do.  That job happens to be in retail (one of my loves)!  I love shopping and I love working in retail so what better way to fill my days than doing something I love...not everyone gets that opportunity.

Back to Black Friday....so in all of the years I worked my hand in retail, I always lucked out and never had to work this dreaded day.  Until now.  We were open for 22 hours straight and I was scheduled from 11:45p-7:30a. 

So, Thanksgiving night, I had to go into work.  After spending all day in the kitchen.  After stuffing my face with food.  After all of that, I had to go into work waaaayyyy past my bedtime! 

Believe it or not, it was actually fun and not as bad as I thought!  I'm glad, though, that I was on the other side of the coin working the holiday as opposed to actually shopping it.  But all in all, I made it, I had fun and I made a little extra money!

Unfortunately, because we were open practically all day and really busy, we really didn't have the opportunity to get out for our breaks, so everyone was tasked with bringing in items to eat to help replenish and reboost our energy levels throughout the morning, day and night.  I decided to bring in a few different things: scones, soda bread and mini-quiches.  Oh my goodness, I cannot even begin to tell you how good these little quiches were!  I'm not normally a fan of egg-y type dishes, especially quiche, but these definitely changed my mind. 

The flavor combination of sweet basil and zucchini with tangy Parmesan cheese and light, fluffy eggs provided our mouths were the perfect bite of sweet, creamy and tangy goodness!  And they're crustless, which was really nice and convenient for popping in your mouth!  These were so good that Chris and I couldn't keep our hands off of them, so I had to make another batch to take into work that night!

Mini-Zucchini & Basil Quiche

Ingredients
1/4 cup Cornstarch
1 1/4 cup Milk
2 Eggs
2 Egg Yolks
1 cup Heavy Cream
3/4 Tsp. Salt
1/8 Tsp. Nutmeg
Cooking Spray
Olive Oil
4 Garlic Cloves, minced
1/2 Onion, diced finely
2 Zucchini, grated
1/4 cup Parmesan Cheese, grated
Fresh Basil, chopped finely

Directions
Pre-heat oven to 450 degrees.

In a medium bowl, whisk together the cornstarch and 1/2 cup of milk until smooth.  Add in the whole eggs and egg yolks, whisking again, until smooth.  Gradually add in the remaining milk, cream, salt and nutmeg; whisk until combined.  Refrigerated until ready to use.

In a large skillet, heat olive oil over med-high heat.  Add in the garlic and onion; saute until fragrant (about 2 minutes).  Add in the zucchini and cook until just softened (about 4 minutes).  Remove from heat.

Spray a mini-muffin tin with cooking spray.  Place a pinch of cheese in the bottom of each cup, topping it with a teaspoon helping of the zucchini mixture and a pinch of basil.  Pour a tablespoon helping of the egg mixture into each cup.

Bake for 15-18 minutes or until the quiches begin to puff up and turn golden brown.  Let cool for 10 minutes and carefully run a butter knife around the rim of each cup to gently lift each quiche out.

**These quiches freeze very well in a sealed Ziploc bag or resealable container.  If heating from frozen state, place them on a cookie sheet and bake for 5-10 minutes at 400 degrees.

Yields: 48 Quiches
Source: Adapted from The Kitchn, originally adapted from Fine Cooking Magazine
Continue reading...

Wednesday, December 1, 2010

Spinach & Artichoke Dip


Print

Rounding out the list of appetizers we had on Turkey Day is this recipe for Spinach & Artichoke Dip.  I've definitely had my fair share of the dip and have tried my hand at a variety of recipes including those that are super easy and require very few ingredients to others that are much more complex, ingredient-heavy and time consuming.  This particular recipe falls right in the middle.  It's actually fairly easy to throw together and in fact, the lengthy part is the baking process. 

This recipe is yet another from the infamous Grand Temptations cookbook....don't you ever get tired of me talking about it?!  I've had that book for years and still haven't made every single recipe in it, so I knew it was time to indulge in this particular one, especially since I've been eyeing it for quite some time.  I'm not really sure why I never made it before, but I can definitely say that this, by far, is the best recipe I've made for Spinach & Artichoke Dip!

It's super creamy, a little rich (but not too heavy) and has the right amount and balance of spinach, artichokes, cheese and garlic.  Served with tortilla chips, crackers, bread or even veggies, this particular recipe is definitely sure to please at any gathering!

Spinach & Artichoke Dip

Ingredients
2 Tbsp. Olive Oil
12 oz. Fresh Baby Spinach
1 - 15oz. jar Artichokes, drained and chopped
1/2 Med. Onion, diced
1 1/3 cups Parmesan Cheese, grated
5 Garlic Cloves, minced
3/4 cup Fresh Basil, chopped
12 oz. Cream Cheese, softened
Salt to taste
Pepper to taste
Parmesan Cheese, shredded

Directions
Preheat the oven to 400 degrees.

In a large skillet, heat the olive oil over med-high heat.  Add the spinach to the pan in batches until it wilts down.  Remove from the heat and chop it up once it's cool to the touch.

In a medium bowl, mix together the spinach, artichokes, onion, grated Parmesan cheese, garlic, basil, cream cheese, salt and pepper.  Spoon the mixture into a baking dish and sprinkle with shredded Parmesan cheese.

Microwave on high for 45 seconds and then bake for 20-25 minutes or until golden brown.  Serve with crackers, chips, bread or vegetables.

Yield: 10 Servings
Source: Adapted from Grand Temptations

Continue reading...
 

With a Cherry on Top Copyright © 2009 Designed by Ipietoon Blogger Template In collaboration with fifa
Cake Illustration Copyrighted to Clarice